Git is an essential development tool, and an endless stream of things to learn. This post is some of the tips, tricks, and configurations I use to make life easier day-to-day. Here’s what’s below:
- Git aliases
- The .gitconfig file
- The –stat flag
- Git stash
- Rebasing
- Git commit amend
- Git cherry-pick
- Git reset hard
Disclaimer: I’m not a git expert. These are just things that have come in handy in my years as a heavy git user.
Git Aliases
Like regular aliases, git aliases can make common commands a lot easier. Here are some of the aliases from my personal .gitconfig:
[alias]
	  co = checkout
    st = status
    br = branch
    ri = rebase -i --autostash
So instead of typing git checkout main I can use git co main, and instead of remembering the full interactive rebase command I like, I use git ri. This leads nicely into my next tip.
Git Config
Your local git installation reads from the file ~/.gitconfig for its default settings, and there’s a lot you can do in there to make your life easier. Aliases are one example, but there are a TON of configuration options.
Here is my entire current .gitconfig, minus one or two lines:
[user]
    name = justin
[branch]
    autosetuprebase = always
[push]
    default = current
[fetch]
    prune = true
[alias]
    lg = log --graph --pretty=format:'%C(yellow)%h%Creset  %s %Cgreen(%cr) %C(bold blue)<%an>%Creset' --abbrev-commit -10
	  co = checkout
  	st = status
	  br = branch
    feap = fetch --all --prune
    rc = rebase --continue
    ri = rebase -i --autostash
    fwl = push --force-with-lease
	  unstage = reset HEAD
[rerere]
    enabled = true
[core]
    editor = /usr/bin/vim
	  ignorecase = false
[url "git@github.com:"]
	  insteadOf = https://github.com/
Use –stat
Git’s --stat option gives you an overview of changes that have been made, on a per-file basis. Here’s an example using the popular python package flask.
Using git lg, I see there was a merge 3 weeks ago:

But what exactly was changed?
Git show –stat
Now I could go to github ui and find the above commit to investigate, but first let’s get a quick overview with git show {commit_hash} --stat:
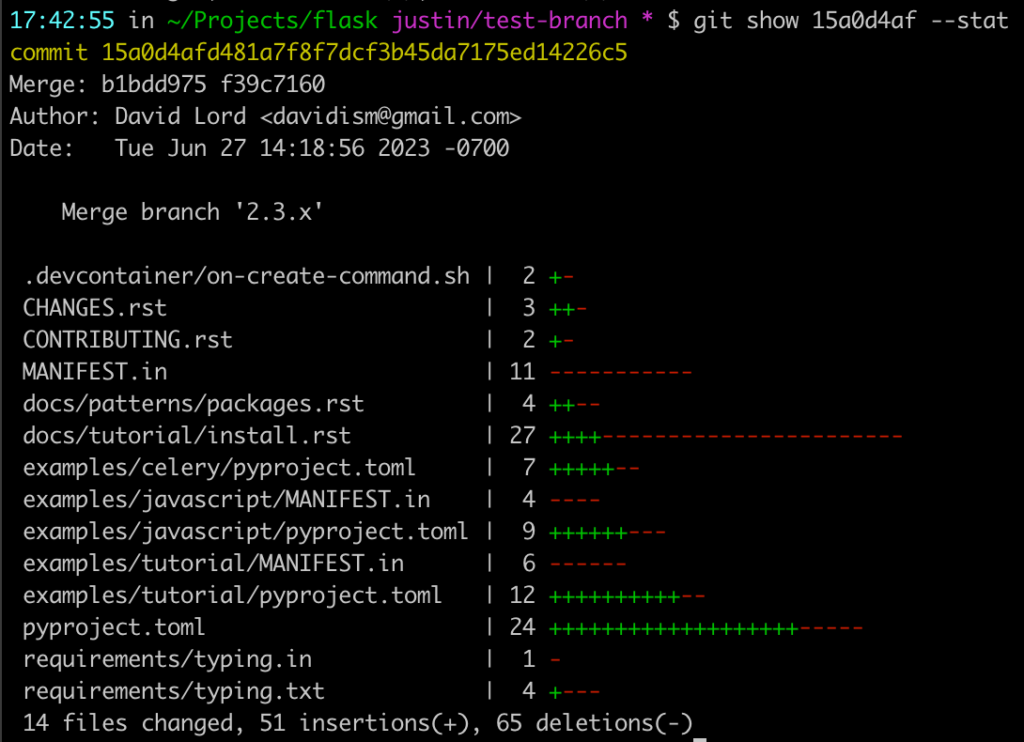
Now I know exactly what files changed, and I can dig deeper if needed.
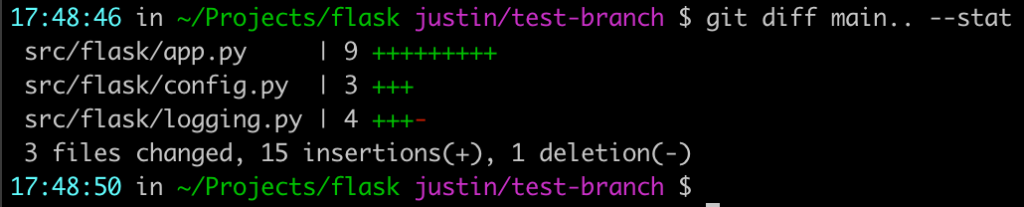
Git diff –stat
The –stat option is also useful when comparing branches locally. I’ve added a single commit to a test branch, let’s see what I did:
I have a separate post about git diff with a bit more detail.
Git Stash
I have a separate post devoted to git stash also, but here are the highlights:
git stash– stash your current changes without committing themgit stash save "message"– save a stash with a helpful messagegit stash list– show a list of everything you have stashedgit stash pop– remove an entry from your stashes and apply it to your codegit stash apply– apply a stash entry without removing it from your stashesgit stash drop– remove a stash entry without applying its changes
For more detail, jump over to my git stash post.
Rebasing
Rebasing is a big topic, for which I plan to write an entire post. For now, here are some things I find helpful.
Always rebase -i
The -i stands for “interactive”, which means the rebase begins in an editor with an overview of the commit history you’re working with:
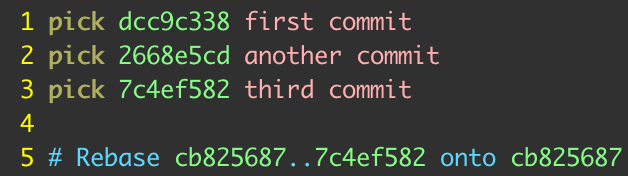
git rebase -i origin/mainIt’s a quick way to make sure your rebase is doing exactly what you think it should, and it gives you a chance to modify your commit history via the rebase commands1 if desired.
Look into git rerere
If you have a rebase-heavy workflow, you might find yourself resolving the same conflicts each time you rebase your code. With git rerere, you only need to resolve them one time.
Git rerere remembers the resolutions that have been applied in past rebases, and if it sees the same conflict in a subsequent rebase it will resolve the conflict automatically.
[rerere]
	  enabled = true
Tag your first commit on a branch
This is another tip for rebase-heavy workflows. When rebasing a long-running branch, it can be hard to tell exactly where your personal changes started in the history, and a bad rebase can result in lost code. If there’s an obvious tag in your first commit message, you can avoid this problem:
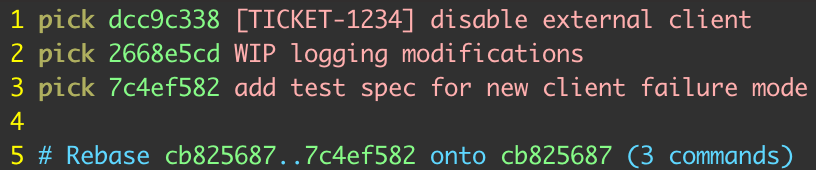
Some codebases have a built in commit hook which automatically adds information to commit messages, which is great. If not, manually adding a tag to your history is a low-budget way to save yourself some headaches.
Git commit amend
Git commit –amend allows you amend, or modify, your most recent commit. You can update its message, its contents, or both. Here’s a quick example:

I’d like to fix the above message, because it looks bad:

If you look closely, you’ll see that --amend created an entirely new commit hash. If this commit hasn’t yet been pushed, you should be ok. But if you’re amending a commit that has already been pushed up, you can run into issues. For more details, check out my post about amending commits.
Git cherry-pick
Git cherry-pick provides a way to pick commits off of one branch and apply them to another2. For example, maybe you forgot to checkout a new branch, and you accidentally committed something directly to main. If you still want those changes, you’ll probably need to put them on a different branch, since committing directly to main is a no-no. That’s where cherry-pick comes in.

Cherry-pick allows you to easily apply this code to a different branch:

Now you can go back to main and undo that commit, and it’ll be like nothing ever happened.
Git reset –hard head~1
This one is a bit of a mouthful. In plain English, this command erases the most recent commit from the branch history. A good time to use this would be immediately after you’ve cherry-picked!
The workflow would look like this:
- Commit to
mainby accident - Checkout a development branch
- Cherry-pick your accidental commit onto your development branch
- Checkout
main git reset --hard head~1to erase the commit frommain
Git reset --hard will erase your changes, and you won’t be able to recover them; there is also a --soft flag.
Using git reset --soft will roll back the most recent commit, but it’ll take its code and put it back into your staged changes, ready to be committed again or modified. For more details, I have yet another post about ways to undo a git commit3.
That’s all the tips I have for now, if I think of more I’ll come back and update this post. I hope this was helpful!
- It’s also another good reason to learn Vim, git’s default rebase editor. ↩︎
- Cherry-pick is also my personal favorite git command name ↩︎
- It doesn’t feel like I’ve done a ton of writing, but I linked to myself a lot in this one. Good work, me from the past! ↩︎
Helpful Links